Grains are extremely versatile. They provide a blank slate upon which you can build any meal, savory or sweet. This week I decided to experiment with a new grain, farro. Farro is becoming more popular these days, so the next time you see it in the store, grab a bag and have fun! Below you’ll find the simple instructions on how to cook farro, as well as some recipe ideas, but I encourage you to add it to whatever meal you’re making and see what happens!

This post contains some affiliate links, which means that we make a small commission off items you purchase at no additional cost to you.
What is Farro?
Farro is a small grain with a chewy texture and nutty flavor. It’s often referred to as an “ancient grain” and is thought to be the ancestor of many modern day grains, including wheat. The flavor and texture is actually quite similar to wheat berries, if you’ve had those. Today it’s most commonly grown in Tuscany, so you’ll find this grain used a lot in Italian cooking. It’s usually sold whole (with husk and bran), semi-pearled (no husk and polished to remove some bran), or pearled (all bran removed).
How to Use Farro
Farro has a nutty flavor (more so when bran is intact) and a delightfully chewy texture–my favorite part! The shape holds up well to cooking, which means it’s great for tossing into soups. The fun, chewy little grain also makes a great addition to salads where they can add quite a bit of texture and inexpensive bulk.
Here are a few recipes to try with farro:
- Mediterranean Farro Salad with Spiced Chickpeas
- Banana Nut Breakfast Farro
- Smoked Sausage with Peppers and Farro
Where to Buy Farro
Since farro is pretty trendy, it can fetch a high price when pre-packaged. I bought my farro from the bulk bins at Whole Foods for $1.69/lb. (organic). Comparatively, the pre-packaged Bob’s Red Mill farro was about $5/24oz. bag ($3.33/lb.) at the other grocery store. You should be able to find farro at most health food stores, some larger grocery stores (especially if they have a natural foods section), or Italian markets.

What Kind of Farro Should I Use?
As I mentioned earlier, you can get whole farro, semi-pearled farro, or pearled farro. Whole farro, which has all of the bran intact has the most nutrients, but it also takes the longest to cook. The more bran that is removed by the polishing (or pearling) process, the more nutrients are lost and the quicker cooking it becomes. I prefer semi-pearled because it cooks relatively quickly, still contains a good amount of nutrients, and has a chewy-yet-soft texture. Because the hull on whole farro requires some extra steps for cooking and semi-pearled farro is much more common in the United States, I’ll be giving cooking instructions for semi-pearled farro.
Cooking Methods
Because farro holds up to cooking quite well, you can actually cook it like pasta (boil in an excess of water, then drain in a colander). No need to measure exact water ratios, like for rice. The degree to which the farro breaks down is much more dependent on the length of cooking than the amount of water or liquid used. You can cook it down to a creamy porridge or risotto consistency, but it just requires a little extra time (and closer attention to the water/grain ratio).
How to Cook Farro
Ingredients
- 1 cup uncooked semi-pearled farro
- 3 cups water
- 1/8 tsp salt
Instructions
- Add the dry, uncooked farro to a pot and stir and cook over medium heat for 2-3 minutes to toast the farro. This will increase the nutty flavor.
- Once toasted, add about 3 cups water, or enough to cover the farro by a few inches, as well as ⅛ tsp salt. Place a lid on the pot, turn the heat up to medium-high, and allow the water to come up to a boil.
- Once the water reaches a boil, turn the heat down to low and let the farro simmer for 20-30 minutes. Start testing the tenderness of the farro around 20 minutes. If you prefer your farro more tender, let it simmer less. If you prefer it softer, let it simmer longer.
- Drain the excess water from the cooked farro in a colander. Use the farro in a recipe, or chill and save for later.
See how we calculate recipe costs here.
Nutrition
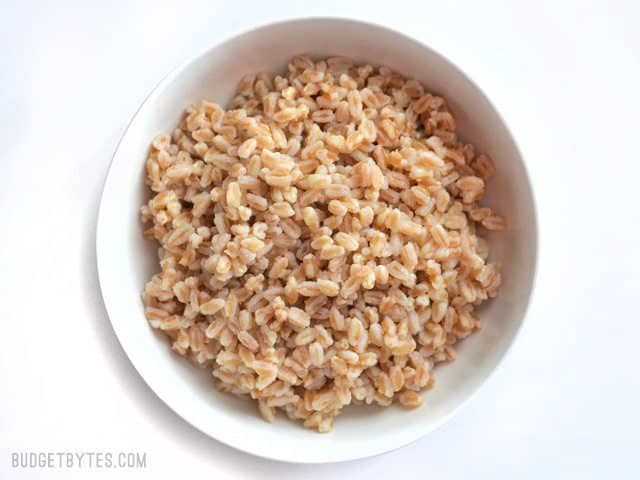
How to Cook Farro – Step by Step Photos
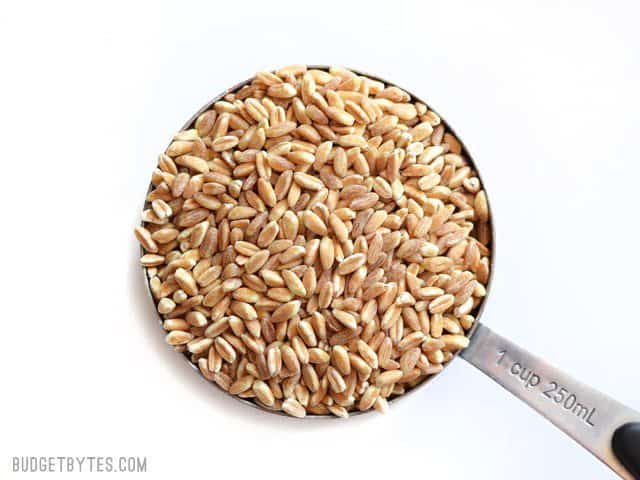
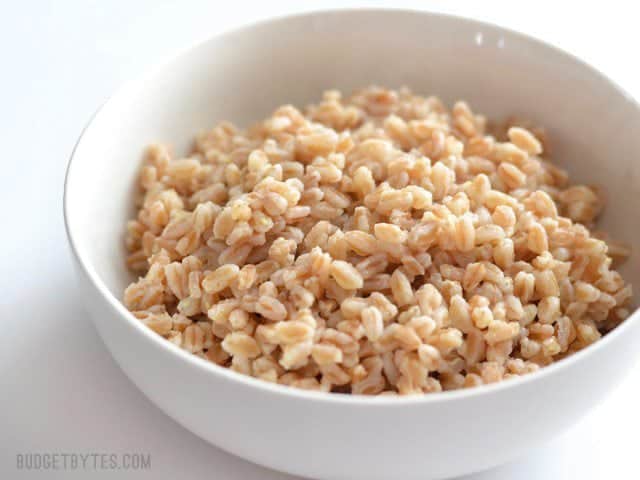
This is what the uncooked farro looks like. You can tell this is “semi-pearled” farro because you can see some of the brown bran, and in some areas it is polished through to the white starchy center. Semi-pearled farro usually needs to simmer for 20-30 minutes to become tender, but the time will ultimately depend on how much bran is removed.
Step 1: Toast the Farro
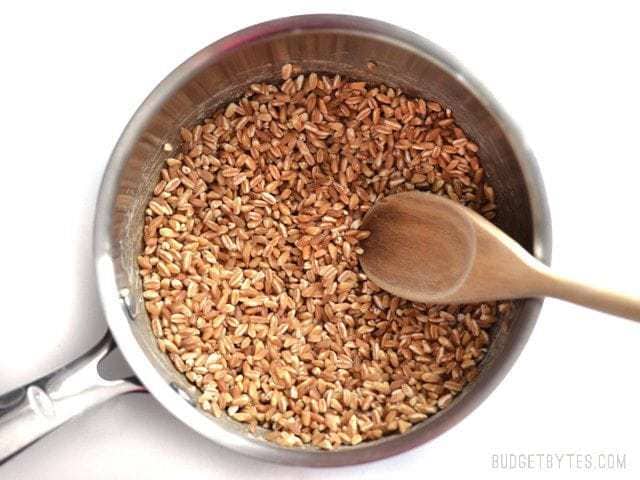
This step is optional, but it does boost the nutty flavor of your farro. Place the dry farro in a pot and cook over medium heat, while stirring, for 2-3 minutes. You should smell a nice toasty aroma, similar to the smell of bread in toaster. When you smell that, you’re good.
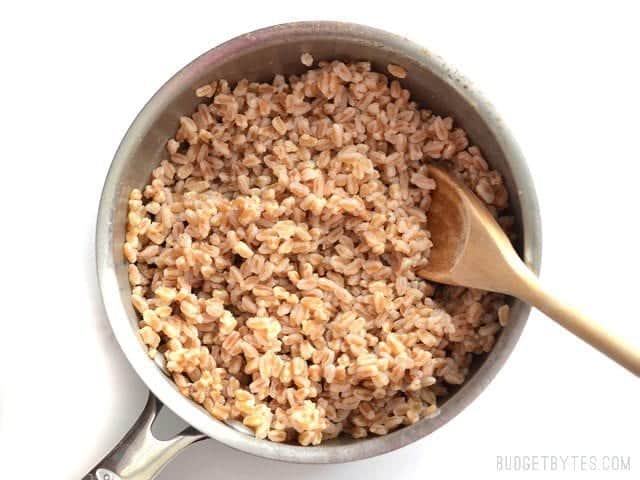
Step 2: Simmer Farro

After toasting, add enough water to cover the farro by a few inches, plus a pinch of salt. For reference, I cooked 1 cup farro and added 3 cups of water plus about 1/8 tsp salt. The pot should already be hot from toasting the farro, so it will come to a boil quickly. Once boiling, place a lid on the pot, turn the heat down to low, and let it simmer for 20-30 minutes, or until the farro is tender. Test the farro starting at about 15-20 minutes to avoid over cooking and to see where you personally like the texture.
Step 3: Drain Farro
The farro will absorb a lot of the water, but the excess should be drained off. You can either use a colander or just carefully tilt the pot while using the lid to hold the grains in place. Drain off as much water as possible to prevent it from turning mushy. I like to let the farro cool just slightly before fluffing it up with a spoon.
Step 4: Eat, Chill, or Freeze
The farro is now ready to eat, refrigerate, or freeze. If freezing the farro, I suggest cooling it completely in the refrigerator before transferring it to a freezer bag, squeezing out as much air as possible, then freezing.
Can I Cook Farro in an Instant Pot?
One of the reasons I bought myself an Instant Pot for Christmas was to make cooking beans and grains fast and easy. This farro, on the other hand, cooked on my stovetop in just under 20 minutes, so I don’t feel it was worth using the Instant Pot. Had I been cooking whole farro, which takes closer to an hour to simmer on the stovetop, I would definitely be using my Instant Pot. :)
Already a farro fan? Share your favorite ways to eat farro in the comments below!
I sauté diced onions, diced sweet bell peppers add farro feta s/p and top with a poached egg for quick delicious breakfast. Infinitely modifiable! Think jalapeños, mushrooms top with avocado…😋
Thanks for your help Beth! I know this is an older post, but I’m new to the “farro” game and I had a lot of questions. You completely de-mystified it for me!
I needed to know how to cook some bulk farro, so I came to you. Thanks so much – I love your recipes and guidance!
I recently ordered a “porridge ” for breakfast at a restaurant that turned out to be cooked farro served with a lightly sweetened coconut milk, dried fruits, marcona almonds and honey. It was absolutely delicious!!
That sounds AMAZING! I might have to try that! Thanks for sharing!
Que Bacana. Não conhecia essa receita…Deve ser muito bom…
How interesting! I did not know this food!
Mediterranean farro salad with vinaigrette, hunks of parmesan, and roasted veggies. I <3 Farro!
Look, I love cooking, and making specialties.
I have an Instant Pot. I have whole farro. I want to cook it in my IP, but I’m nervous about getting the water & time right. Would you say to just treat it like brown rice? Any other suggestions?
Unfortunately, I haven’t tried cooking farro in my Instant Pot yet. It will also depend on how polished or pearled the grains are. Maybe check the manual to see if they have suggestions for wheat berries. It will be closest to that. :)
I like to make a simple lemon juice/olive oil dressing (w/salt and fresh pepper to taste) and combine it with farro, shredded chicken, feta, and red grapes
A thing I like to do is get a rotisserie chicken, disassemble it, put the skin, bones, etc. in a pot to simmer for a while while shredding or chopping up the chicken meat; then strain the broth, add a cup of farro to it, cook, and add the meat back in at the end.
What’s the ratio of dry-to-cooked for farro?
You actually don’t have to worry about that. Cook it in an excess of water and pour off the extra once it’s tender. :) Just add enough water to the pot to cover the farro by double the volume.
1 cup of dry farro will be 2 cups of cooked farro.
Hi! I’ve been to two Whole Foods in NYC (Manhattan) and haven’t seen Farro in the bins. Is it called or sold by another name? Thanks for the help.
Hmm, not that I know of. But every store is going to carry different items. You can probably ask the grocery manager if they can start carrying it. :)
I’ve seen it labeled Winter Wheatberries or Red Wheatberries At Whole Foods.
For salads, like your Mediterranean salad, have you/anyone tried using stock to make the farro?
Joy: Farro and wheatberries are essentially the same thing (http://motherwouldknow.com/what-is-the-difference-between-farro-freekeh-and-wheatberries/) and wheatberries are always WAY cheaper than farro. I’ve had both and honestly can’t tell the difference.
Thank you for breaking this down! I will definitely be trying farro, I really like shaking things up with grains. I use rice and quinoa a lot, but I also have made millet and amaranth,. I’m excited to see how it goes making farro!
Beth, I am a new Instant Pot owner and completely in love with it. Are you going to be posting more IP specific recipes, or suggestions on adapting existing recipes? Thanks!
I’ll most likely just be adding notes to future recipes about how it can be done (IF it can be done) in the Instant pot. I don’t want to do a lot of IP specific recipes because I know that 99% of my readers don’t have one. I mainly bought mine to make beans and slow cooked meat faster and easier, not necessarily to make whole recipes in. :)
I like it in soups- I substitute it for the pasta in soups such as pasta fagiole. Or for a quick soup, toss in chicken broth with canned chicken and some onion, celery, and carrots, and a Parmesan rind. Or a type of risotto with Parmesan and peas, drizzled with olive oil. I bet it would be great in a casserole too- in place of rice.
Farro is the best!! In summer I eat farro salad probably five nights out of seven. Tomato, cucumber, shallot, a dressing of olive oil, white balsemic vinegar, salt, pepper and parsley, with basil and feta scattered over the top. I credit this salad with losing 20 pounds without even realizing I was doing it.
I may have to try farro.
I wish you’d done the Weekly Recap! I don’t care so much about the receipts, but like the “What I Cooked” and “Reflections” parts the most.
I cook my Farro in my rice cooker. Works great. I also like to saute some cherry tomatoes and mushrooms and stir them in when the Farro is cooked…. along with one of my many favorite cheeses…… In the summer I saute zucchini and yellow squash and stir those in. Add anything to it that flips your skirt… even canned salmon or canned chicken OR fresh!
To cooked farro I add some olive oil, prepared pesto and fresh parsley to taste. My family loves it either hot or cold. It’s filling, simple and delicious.
I have not tried Farro, but am inspired by your post and comments and no doubt the forthcoming recipes!
For future consideration if you are interested…not technically a grain, but used like a grain: buckwheat. Roasted buckwheat = kasha and it is prepared like most grains. I had used the flour a lot as I like buckwheat waffles, etc., but I hadn’t cooked the groats until recently. I like it doctored like oatmeal, as a rice/rice salad substitute and I sub some for oatmeal in granola.
Looking forward to the Farro recipes!
I make risotto with it. Mushroom, shallots and goat cheese is a favourite. The liquid ratio is very forgiving. Reheats well too.
This article is the perfect example of why trips to stores that usually have higher prices should not be condemned. I saw on your Facebook page that someone was upset with you for going to Whole Foods, which very much reminds me of the people who think it’s hypocritical for me to spend food stamps at the tiny natural foods store near campus. They refuse to believe that some things are actually cheaper in the bulk bins there. I save about a dollar a pound on barley, and they have a better selection of beans, some of which are less expensive than the grocery store bags. Cooking good food on a tight budget is easier when you know where to get the good deals.
Do you not have to rinse the farro before you cook it?
I didn’t, since the extra water was getting drained away anyway. You can rinse it before or after, but rinsing before makes the toasting step more difficult.
Didn’t think about how rinsing would effect the toasting process. Thanks!
So glad you’re doing a week of recipes! Farro is a favorite for me. Trader Joe’s has a nice quick cook version.
This one pot farro with tomatoes and basil recipe from Smitten Kitchen is not only my go to farro recipe, but also my favorite weeknight recipe! It always turns out perfectly!
http://smittenkitchen.com/blog/2013/07/one-pan-farro-with-tomatoes/
Can you cook it in a rice cooker? (I have the cheap kind with no settings, just push a lever that pops up when it’s done.)
I have a rice cooker that functions the same way and I cook farro in it all the time! 1 cup faro to 2.5 cups water.
I’ve never tried toasting it beforehand though. Meet to try that next time!
I was wondering the same thing, since the cooking method is so similar.
I love farro! Such a good grain especially for cold or room temperature salads. It really absorbs vinaigrette without becoming soggy. I love to use it with a cumin, lemon, and honey vinaigrette and whatever veggies I have avaliable.
I was going to say the same thing! Love it during the summer for a change of texture. I love it with sausage & veggies & a simple vinaigrette. I buy the quick cook farro & barley from Trader Joes.