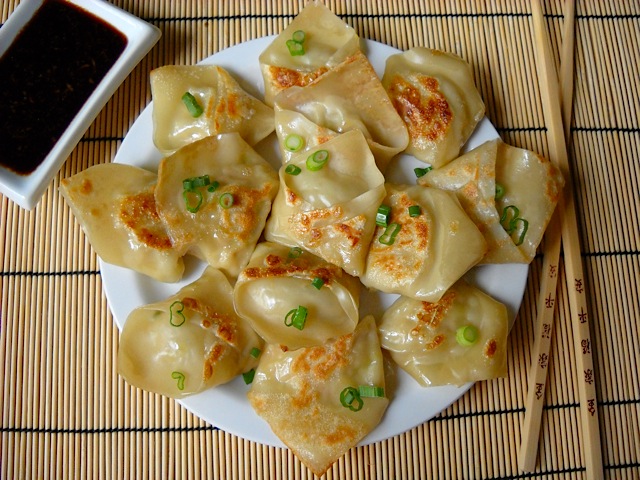
I wanted to make something to eat along side my sushi bowls this week so I decided to make some Pork and Ginger Pot Stickers. I remember attempting to make pot stickers a long time ago but… well… lets just say they stuck to the pan and just didn’t work out. This time I did a lot of recipe research and tried a few different methods of cooking them (boiling, steaming, frying and combinations of all three) and I can proudly say that I think I have mastered the art of the pot sticker. The process is a little lengthy and requires a lot of steps so I’m going to rate this as “advanced”. That being said, don’t be afraid of them. They’re quite delicious and a great challenge/experience for those of you who are more seasoned cooks. The greatest part about these pot stickers is that you can fill them with just about anything… while you stand there filling and folding them you’re likely to come up with about ten different delicious ideas for fillings. I know I did!
I used shredded and sauteed cabbage here as a filler to offset the cost of the ground pork (the most expensive ingredient in the dish). I also had a little bit of leftover shredded carrot from the sushi bowls so I threw that in as well. Don’t be tempted to use dried, ground ginger in place of fresh grated ginger in this recipe. Fresh ginger is quite inexpensive (you can break off a chunk that is just the size you need, you don’t have to buy the whole big piece) and it adds an amazing amount of bright, fresh flavor. The fresh ginger and green onions really made these pot stickers shine!
Pork & Ginger Pot Stickers
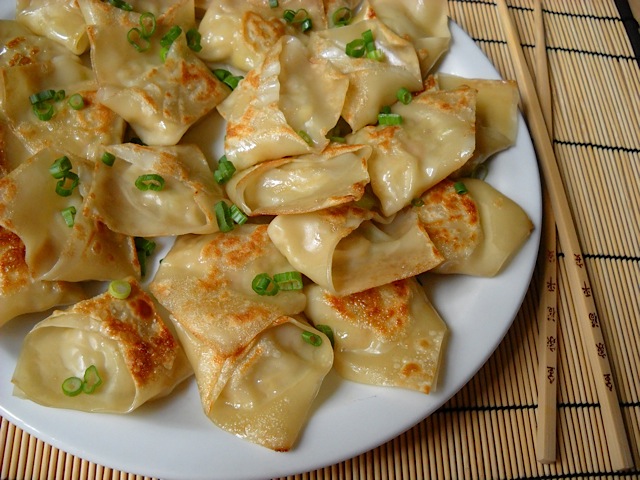
Pork & Ginger Pot Stickers

Ingredients
- 1/2 lb ground pork ($2.75)
- 1 small head green cabbage ($0.96)
- 1/2 tsp salt ($0.05)
- 2 Tbsp vegetable oil ($0.07)
- 1 inch fresh ginger ($0.11)
- 1 clove garlic ($0.06)
- 1 tsp soy sauce ($0.02)
- 1/4 tsp sesame oil ($0.04)
- 1 sliced green onion ($0.05)
- 1/4 large carrot, shredded (optional) ($0.05)
- 1 package 52 wonton wrappers ($2.39)
- 3 cubes bouillon ($0.36)
- generous non-stick spray ($0.05)
Instructions
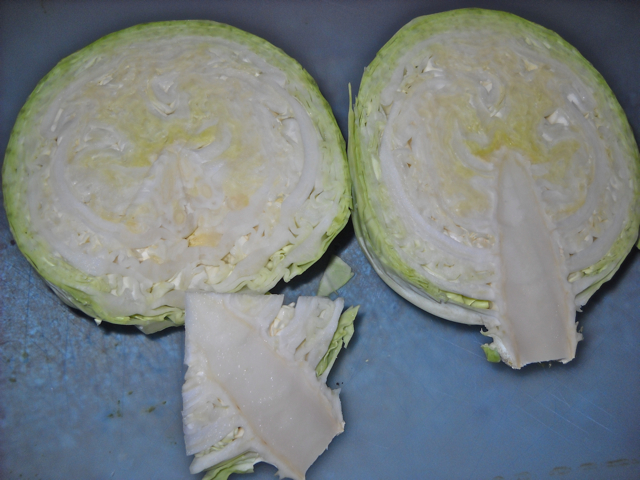
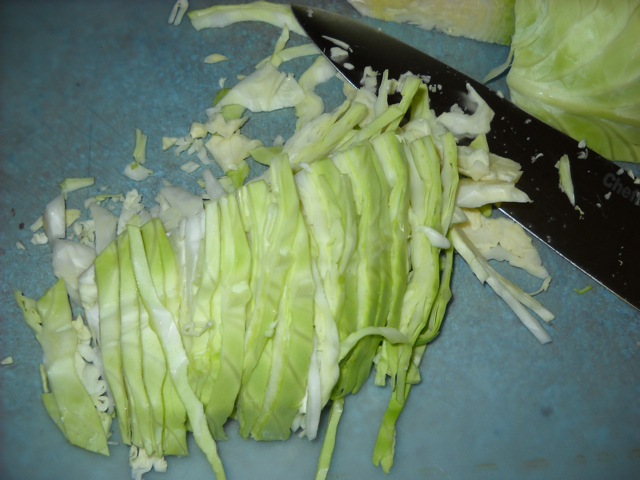
- Peel off the outer leaves from the cabbage. Slice the head in half and remove the core (see photos below). Cut each half into two then cut crosswise as thinly as possible. You need a very small shred to make the pot stickers easy to fill and fold.
- In a large skillet, heat 2 Tbsp of oil over medium/high heat. When it’s hot, add the cabbage and 1/2 tsp of salt. Saute the cabbage until it is translucent and soft (about 15 minutes). Remove from the heat and let cool slightly.
- While the cabbage is sauteing (stir every minute or so), combine the raw ground pork, peeled and grated ginger (use a small cheese grater), minced garlic, soy sauce, sesame oil, sliced green onion an shredded carrot. Mix them all together well with your hands. Add the shredded and cooked cabbage and mix again until it is evenly incorporated (you almost have to use your hands here). Refrigerate the mixture for at least one hour to let the flavors blend. (The cabbage will release gasses as it refrigerates and smell pretty stinky when you come back to it but don’t be afraid. It’s still good and the smell will go away when you cook the pot stickers.)
FOR THE POT STICKERS:
- Prepare your workspace by getting a small dish of water (used to glue the edges together), something to fold the pot stickers on (I used a cutting board) and something to keep them on once folded (another cutting board or large plate). I used square wrappers so the wrapping technique below is based on that. There are many methods to folding pot stickers/won tons so if you have a different shape, simply do a google search for “folding won tons” or “folding pot stickers” to see more methods.
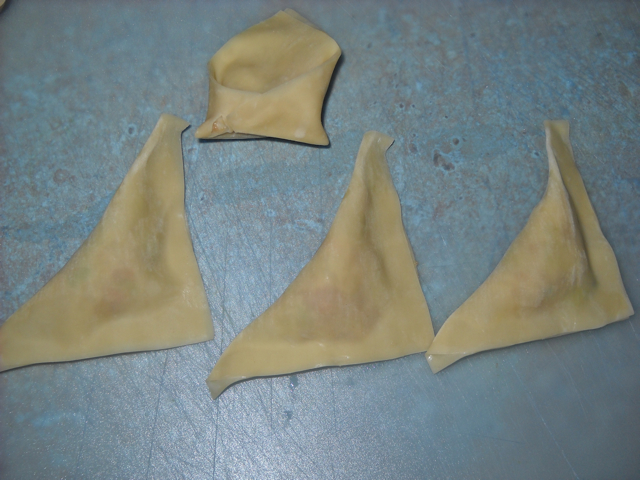
- To make things easier, fill and fold the wontons in groups. I filled and folded three then moved on to the next group. Take three won ton wrappers and lay them on your surface. Using your finger, wet all the way around the edge of the wrapper. Place about 1 tsp of pork filling in the center of each square. Fold the square over diagonally from one corner to the opposite corner. Press down all along the seam to make the wet edges stick. Squeeze out all of the air in the process.
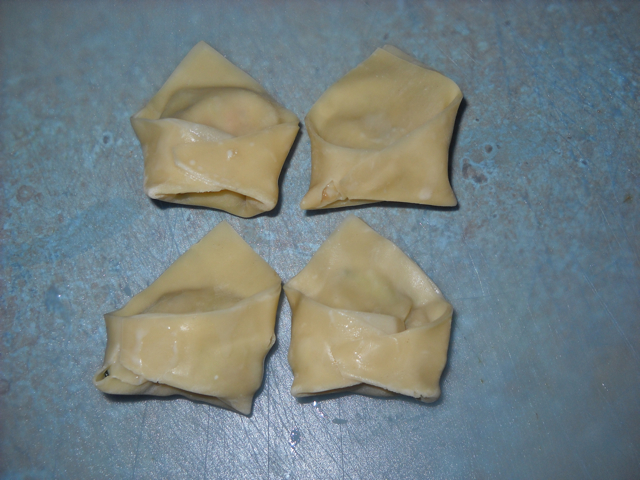
- Take the two points of the triangle that are furthest from each other and wrap them around front and pinch together (use a bit more water to glue it together). The pot sticker is now folded! Fold the rest in the same manner. Once all of the pot stickers are folded, you can either cook all of them or freeze some on a cookie sheet. Once they are completely frozen solid, transfer them to an air tight freezer bag for storage. You can take them out and cook them as usual at a later date!
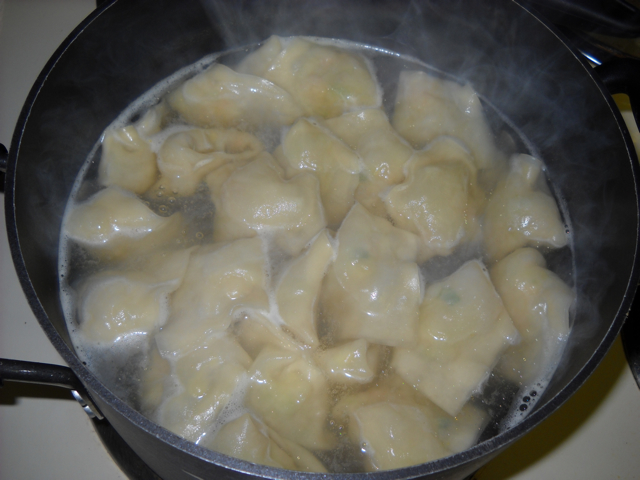
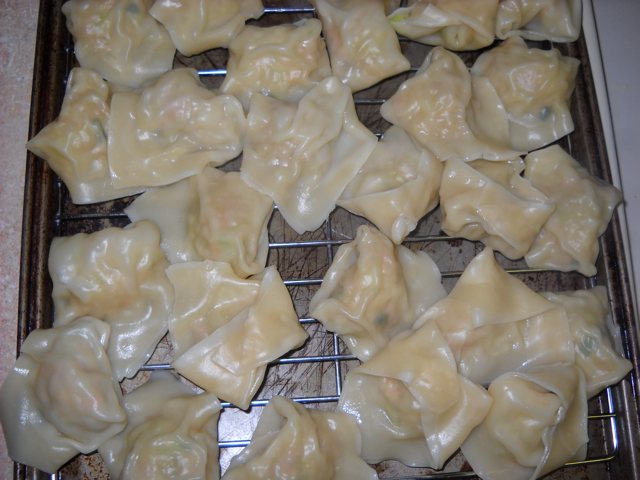
- In a large pot, bring 6 cups of water and 3 bouillon cubes to a boil. Once it reaches a hard boil, drop in about half of the pot stickers. Boil them until they begin to float (about 7 minutes) then transfer to a cooling rack to drain. Place a baking sheet under the cooling rack to catch any water that drips off.
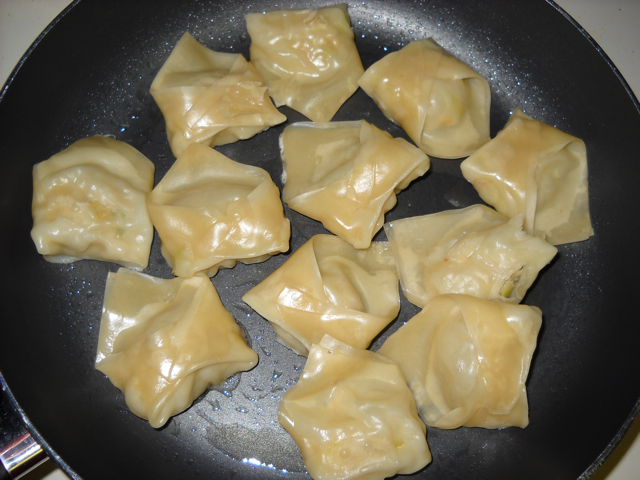
- Once the pot stickers are done boiling and have drained for a minute or two they are ready to fry. Heat a large non-stick skillet over medium/high heat. Spray it generously with non-stick spray. Using a non-stick pan with non-stick spray is the easiest way to make the pot stickers crispy without having them stick, tear and use a ton of oil. Pan fry the pot stickers on each side until golden brown and crispy (2-3 min on each side).
- Serve immediately with your favorite asian sauce (soy, oyster, teriyaki, sweet chili… anything goes!).
See how we calculate recipe costs here.
Nutrition
This post contains some affiliate links, which means that we make a small commission off items you purchase at no additional cost to you.
Step By Step Photos
To core the cabbage, cut the head in half then make diagonal cuts along the core to remove the triangle/cone portion surrounding the core.
Cut each half of the cabbage head in half once more then cut crosswise as thinly as possible to achieve a “shred”.
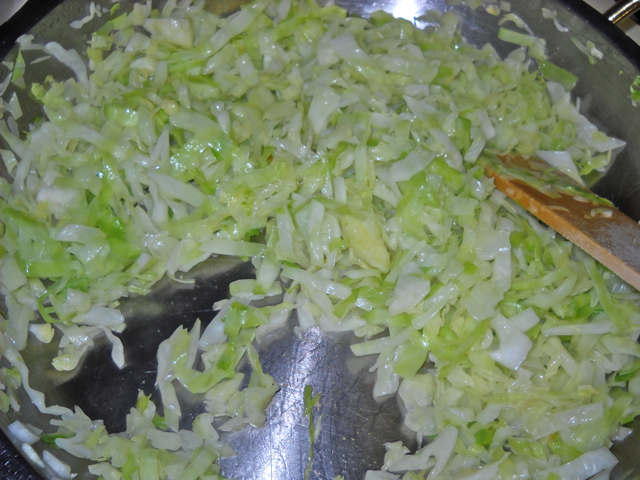
Saute the cabbage over medium high heat with 2 Tbsp of oil and 1/2 tsp of salt (to help draw out the moisture) until it is transparent and limp.
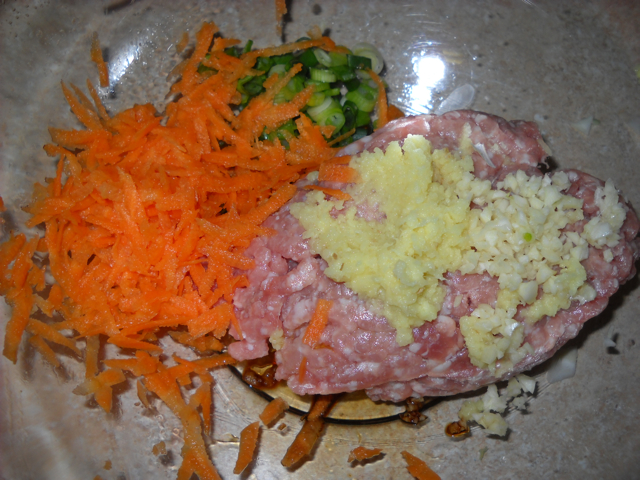
As the cabbage sautes, combine the ground pork, peeled and grated ginger, minced garlic, sliced green onions, soy sauce and sesame oil. Mix well with your hands.
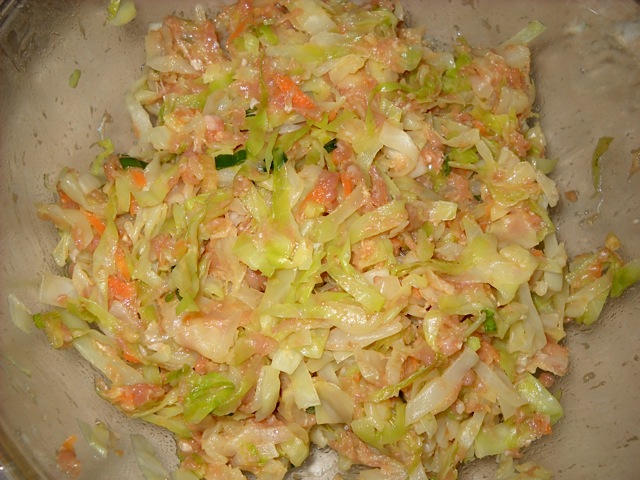
After the cabbage has cooled slightly, mix it into the seasoned pork. Refrigerate for at least an hour to let the flavors blend.
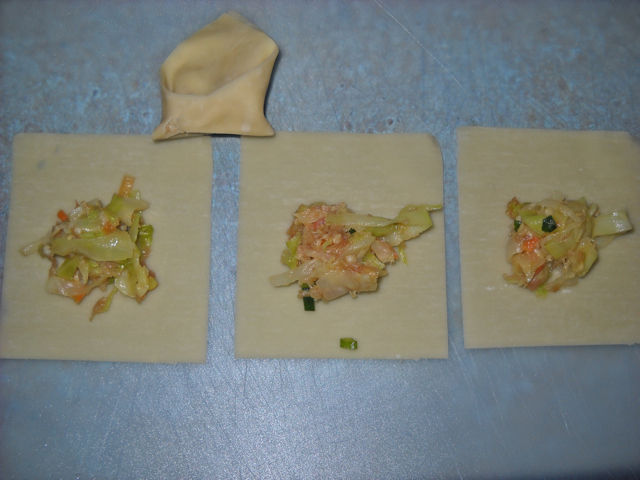
Lay three or four wrappers out at a time and use your finger to wet the outside edges. Place about one tsp of filling in the center of each (the top one is the finished product).
Fold them diagonally over the filling from corner to corner. Press the wet edges together while squeezing out any air pockets.
Next, bring the two points together in front and squeeze together to seal (place another drop of water between the points). Now you have your folded pot sticker!
Bring six cups of water and three bouillon cubes to a rolling boil. Drop in about half of the pot stickers (you don’t want to over crowd) and boil until they all float like in the picture (about 7 minutes). Drain on a cooling rack that is placed over a baking sheet.
Here they are draining. See how lovely and transparent the skin gets? Boil the second batch as you move on to frying the first batch.
Heat a large non-stick skillet coated with non-stick spray over medium/high heat. Fry the pot stickers until they are golden brown and crispy on each side (2-3 minutes each side). Now they’re ready to eat!
NOTE: Once again, I bought my groceries at a store that is generally more expensive this week because it was convenient. The ground pork was about $2/lb. more expensive than I would have normally paid. That being said, the recipe was still quite affordable (thanks to budget byting principle #2). I have not comparison shopped for won ton wrappers so I’m not sure if the price I paid for a pack of 52 was relatively high or low.
If you’re not sure where to find won ton wrappers, check in the produce department near the tofu and meat substitutes. They have to stay refrigerated so they are not usually near the other asian ingredients. Sometimes they can also be found frozen.
While these pot stickers were amazing, they are not one of those dishes that tastes *better* reheated the next day. They lose a little bit of their unique, delicate texture when reheated but still taste great and are quite filling. The best way to reheat these is to saute again in a non-stick skillet to retain the crisp texture. I will be taking these with me for lunch so I’ll have to use the microwave and lose some texture. Despite the loss of texture during the reheating process, I have still found myself excited when I remember that there are yummy pork pot stickers waiting to be snacked on in the fridge!



I can’t wait to make these! Beth, any ideas on how to morph these into Won Ton soup?
Hmmm… I bet you could just drop them into boiling soup and let them cook that way.
Have to share the first time I tasted pot stickers. I was at a friend’s house, we were playing poker, and his mother comes home with two other Chinese ladies and they go to the kitchen and start cranking out pot stickers. Must have been for some event, but they were not going to let the poker players get away without eating some. I loved them, ate a lot of them, but not enough for the guy’s mother. She pressed yet another plate full at me, saying “I Jewish mother!”
These are amazing!!! I made them with tofu instead of pork, and I had to increase the seasonings and add some mushrooms to give it a deeper flavor and make up for the lack of pork. My family loooooves these!! :)
These were phenominal! A little time consuming to put together, but well worth it. They were a hit with my husband and son too…we ate them all! Will definitely be making these again!
Katiee – They should stay good in the freezer for at least 3 months. After that they may start to dry out a bit.
How long would these last in the freezer??
You really don’t need the added step of boiling them, just saute them in a little oil to give them some color, add 1/3 cup water or chicken stock to the frying pan, cover, lower heat as low as it will go and let steam 10 minutes, remove lid and continue cooking another 2 minutes and all liquid has evaporated. You can loosen them carefully with a teflon spatula so they don’t stick too much. The last 2 minutes is what gives them all the flavor. A nice dipping sauce would be equal parts soy and fresh lime juice with a little finely diced green onion.
I made these last night and they were delicious! I made my own wonton wrappers also; it’s pretty easy, just flour, egg, salt & water. Very inexpensive to make a lot of wrappers, you should try it. Thanks for this recipe!
Beth, you rock!
Ah! Thanks for your comment! Now I know a couple areas that need to be clarified for sure… I didn’t use three wrappers per pot sticker, I just filled and folded them in groups of three because it was easier than doing one at a time. Sorry for the confusion! I will definitely mention the raw pork as well.
used 4 of your recipes for an asian themed dinner party tonight, these were the favorite of the night and everything was amazing… followed the directions to a T.
i’m not an experienced cook at all, just good at following directions… but just FYI, it wasn’t clear to me that you didn’t cook the pork before you put it in the wrappers. i had to read it a few times and look closely at the pictures to determine the meat was not cooked when you mixed the cabbage with it… might want to clear that up for those of us who have few cooking skills.
also, i’m wondering if you had really thin won ton wrappers… you suggested using 3 wrappers per pot sticker…i bought a pack which only had 30 or so pot sticker wrappers and used 1 each
This recipe looks absolutely delicious. I am insisting that Derek make some of these this week.
I just made these for dinner and they were amazing! I made them with pork and beef because I wasn’t in the mood for cabbage, everyone loved them! Thanks for a great recipe!
Between these and the lobster and cream cheese stuffed wontons I am super excited to try making my own fillings. Thanks!
It is a very famous recipe in my family.